Hacking RF Instrument Cluster display

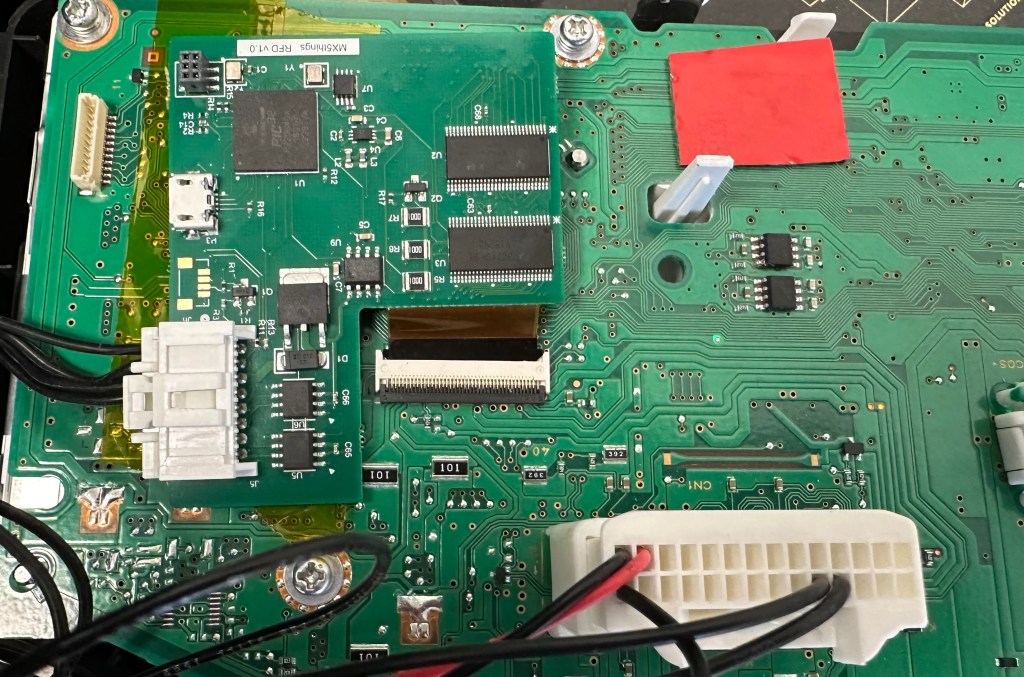
The Mazda MX-5 RF has a graphic LCD screen as part of the Instrument Cluster. I thought it would be cool to access it to show additional information on that screen. The LCD is 4.6″ with an FPC cable to the mainboard. The LCD is controlled by the graphic processor Yamaha YGV642, which would be the perfect option for customization. Unfortunately, Yamaha denied my request to share the datasheet and I could not find anything in the public domain. I decided to use an external graphics processor and implemented a video switch, to control the LCD. To accelerate development, I chose the Microchip development board and made a simple PCB with connectors and a video switch.

Of course, it is bulky, but I got immediate access to the LCD screen and can start work on software. The LCD screen has a resolution of 432×432 pixels with a simple RGB interface, 6 bits per color, with a 62 Hz frame rate. I was able to synchronize my processor with Yamaha, which allows me to insert a portion of my graphics and leave some untouched. My first test was the implementation of a digital counter.

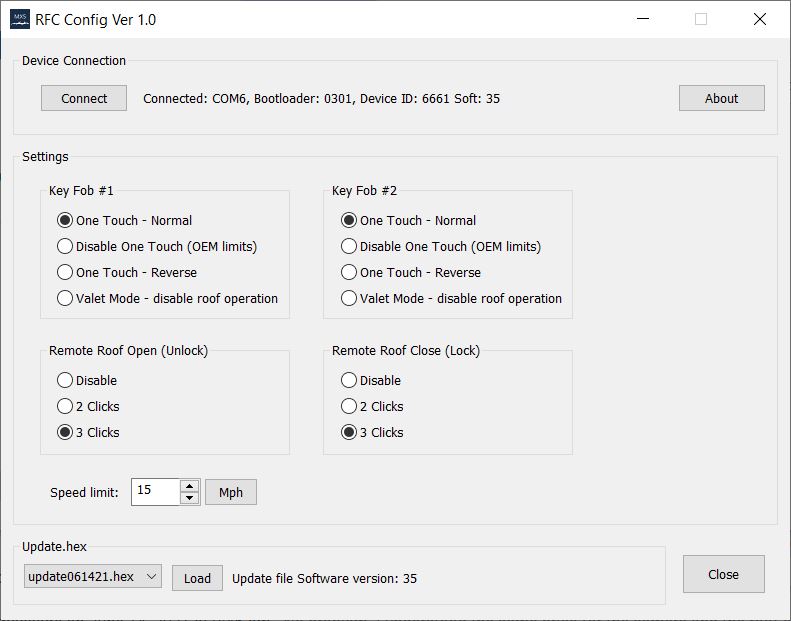
The first project is the implementation of the digital speedometer. Current speed is available on the CAN bus, so it makes it easy to capture it using just one wire soldered to the mainboard, directly to the Rx output of the CAN receiver chip. Switching from “mph” and “km/h” is also available through CAN messages. I implemented this as well. The speedometer comes on screen after four clicks on the “Info” button, and the next click will turn it off.  During the road test, I found that the digits switched too quickly when the speed was on the borderline of the next number. To avoid this I implemented a simple filter, averaging 32 samples. Now it is perfect.

The next project will be an implementation of an analog clock, which will show up when the engine is turned off and stay until you open the door or click the Info button to another feature.

The power reserve handle will show the battery’s voltage, which will be useful to see when the engine is off.

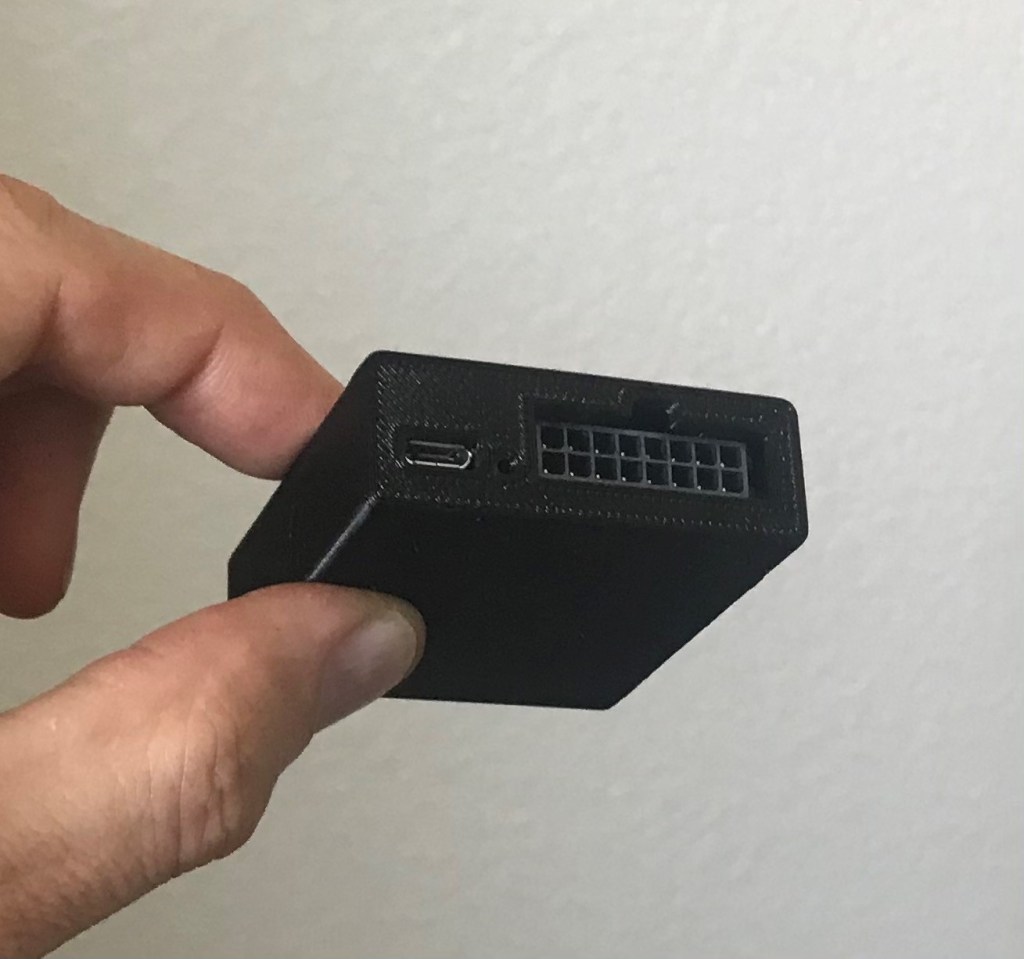
I will design a smaller single PCB with a microprocessor and FPC connectors to make installation simple. CAN bus is not present on the FPC connector, so one wire needs to be directly soldered to the mainboard. The software can be updated at any time via a USB cable.

Update 11/29/2023

Finally some progress with this project.

PCB with flex cable assembled. Added analog interface to connect external temperature sensor.

Opening and closing RF roof with a key fob

You can put the roof down while you approaching the car, how cool is this?

After successful implementation of the one-touch roof control module, next idea is to do this using a key fob from outside the car.

This is a very challenging task because the roof mechanism operates only when Ignition power is on. To solve this problem, I modified my ACC controller to control the IG relay instead. This module would listen to CAN messages and when activate IG relay when needed by pressing Lock or Unlock buttons on the key fob. After roof operation completed (which is also known as an event on the CAN bus) IG relay will be turned off. RF controller also can listen to CAN bus for key fob messages and activate mechanism when needed.

Quick implementation was successful, and I got everything working as desired. Because I already had Windows Controller installed, everything is fully functional. Technically windows controller could be optional, but if you leave windows down and then remotely put the roof up, there is no way to close windows without entering the car again. Also, in a US car after closing the roof, windows will leave a gap of 1″, which I can close remotely with one more click.

We tested it with RF 2017 and RF 2020, MT and AT versions.

This product will be available by end of June 2021 from our store.

“SmartTop” alternative

One of the most popular modifications for MX-5 RF is adding the “SmartTop” module made by mods4cars. This is a very simple electronic device, but it cost over $300, I think because there is no competition. I decided to design and produce my own version of such a device. Basically, it is just a CAN bus bridge, which can filter can messages, to trick the roof mechanism by blocking messages which will disable operation (like higher speed, car in reverse, etc). My previous project for the front camera kit has a similar design, so it was easy to reuse it for this project.

Implementing a one-touch feature is very simple as well, because the roof control switch produces only two voltage levels, to keep the roof opening or closing.

Another idea for this device is to be able to control the roof using the key fob like it is done in BMW Z4 for example. So you open the roof while approaching the car. This is quite a challenging task because the roof mechanism operates only when Ignition power is on and other modules on the CAN bus operational. I’m hoping to override these limitations by integrating the IG power switch for the roof controller in my device and substitute the CAN messages for initial communication.

My first version of this device now operational for all basic features. The software can be updated at any time via USB cable. To do this, my son made for me a Windows application.

Because I have to have communication with Key Fob, I found that it would be useful to have different configurations assigned for each key fob. If you need to give the car to someone else, you can share a key that has disabled the new feature, to avoid confusion at the service center for example. Or for valet parking, you can share the key with completely disabled roof control, so they can’t play with this feature.

Hardware installation will be exactly the same as for “SmartTop”, YouTube has tons of videos on how to do this.

The module it self 50mm x 59mm x 18mm. It has a Micro USB connector for programming, LED status and a 16 pin connector for the main harness, similar to “SmartTop” is using. This device with a harness will be available in my store for $159.

BlackVue 750X

The new product line from BlackVue 750X series has an integrated battery monitor for recording in parking mode. I installed 750X-2CH-32GB in my MX-5 RF under the rearview mirror.

This image has an empty alt attribute; its file name is front.jpg

The rear camera attached to the wind blocker.

This camera set comes with a new power cable, with 3 wires to connect to battery power, ACC power, and ground. Unfortunately, the new power connector is not compatible with the previous 750S series. I modified supplied cable to connect it with a rearview mirror harness.

In parking mode, the camera can record in time-lapse mode or activated by an accelerometer. With a setting of the battery limit of 12.5V, I had 2-3 hours of time-lapse recordings.

I have a 32GB SD card option, with the highest quality settings it is enough for two hours of recording.

Measuring dark current.

Modern cars with lots of electronics always have battery drainage even the engine is off. Electronics will go to sleep mode, but it will still consume a little. I have designed many electronic accessories and decided to check if there is any effect on battery life. My test car is the 2017 Mazda MX-5 RF Launch Edition. It has a SmartTOP module installed as well as my front camera kit, ACC controller, and automatic footwell light.

Measuring current accurately is a little tricky because any circuit interruption will wake up all electronics again. Also range from 10A to milliamps. To avoid these issues, a circuit switch is really handy. I found a good option on Amazon. Because I’m often testing new electronics, I found that having this device installed is time-saving.

Now, when the switch is in position “Power on” I can safely attach the multimeter and after 2 minutes switch can be disconnected and a small current will go through the tester.

When car is unlocked, current stays about 100mA

The proximity of Key Fob seems to have no effect on this test, however when the car was locked, this current drop to about 15mA, which is a very little drain.

This means if the car is unlocked for a long time, it will drain the battery faster.